Sunday, November 27, 2011

Year 6 Farewell

Here's a picture taken at Cal's Year 6 Farewell Dinner on Friday night.


It was a wonderful evening for him, and thankfully lived up to all his expectations!  A time to celebrate with his friends, some of whom are leaving for other schools out of the area, and to say goodbye to the teachers he's spent the last eight years with.

We're so proud of him.

(The last week and a half has been so hectic it really is kinda crazy . . . But this coming week sees us return to a bit more of a normal pace and hopefully I can keep this journal a bit more up to date!)

* Photo taken by Mary Canning

Monday, November 14, 2011

The Tunnel

Last summer I decided to build a poly tunnel - a real polythene tunnel. The cover on the last one blew off in the wind a few times. This is it behind some good looking beans, spinach and broccoli.

The original poly tunnel

The new tunnel has a metal frame, concreted in posts, and a real polythene cover. It is 14 metres long by 6.2 metres wide. Boxing Day 2010 was windless with not much else happening, so Caley & I put the cover on by ourselves and started to move some of the benches inside.

Inside the new, much larger and more substantial poly tunnel

Today, it contains a bed for tomatoes, zucchinis, Lebanese cucumbers, capsicums, and there's also some lettuce and spinach under-planted. We have also moved in two cumquat's that came up from Sydney and have since struggled with the climate, plus a lime and lemon tree. These will probably live in here permanently, the lime in particular is thriving.

Tomatoes and Zucchinis

At the southern end is where I root cuttings in the misting chamber, and have workbenches for potting them up.

Separate misting area on right

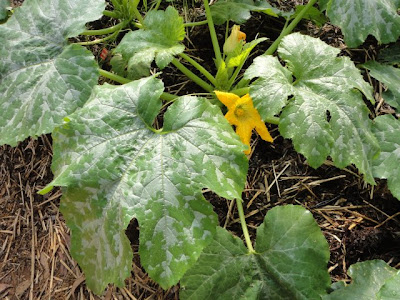
Zucchinis grow so quickly in the heat of the tunnel. They're almost ready. And it's unlikely that the 'roos will venture into the tunnel, so we might get to harvest them soon.

Zucchini flowers

Wednesday, November 9, 2011

Spring Cleaning

Last week I tackled the huge pile of unopened post, old school assignments and general chaos in our study. With all four of us using this room for all computer work and school stuff it sees a lot of activity and it really needed a bit of a clean up.

It felt so good to get it sorted out that this week I decided to tackle the laundry. Another room that definitely sees a lot of activity!


And, I'm so happy that it's clean and working more efficiently that I've decided to 'spring clean' other rooms in the house, including spending a day just on the windows (a massive job).

With three weeks left of spring, it's a good thing I've made a start . . there's lots to do and I'd like to get as much done as possible before school finishes early in December and we start the lead up to Christmas.


Monday, November 7, 2011

Star Jasmine


As soon as you step outside the front door, you can smell the beautiful perfume from the star jasmine. 


It's closest to Keira's bedroom, so when she opens her windows the scent wafts in. Although it's so strong that you can smell it around that whole end of the house. So lovely and such a summery smell.


Sunday, November 6, 2011

Steps

Over the last few weekends I've spent some time levelling our car park. It was a gentle slope following the contours down towards the veggie patch. Lots of cut & fill with the excavator, and the result is that it's now levellish(?).

However, the cut has meant that we need some steps.... so today's job was to smarten up the stepp bank and install some steps. This is the start of the set-out... making sure they're straight, square, level and with even treads....


It all came together quickly, once the set out was done.... cut out five rebates in each stringer for the five risers. As the rebate would be buried, I used an axe instead of a chisel... a lot quicker. Then set the stringers in place, and nailed the top & bottom riser in place.... a few small adjustments to the stringers to ensure they were still square, straight and even. Then hammered in four short hardwood posts and nailed the stringers to them... this will make sure the whole structure doesn't slowly migrate down the slope. And the 3 intermediate risers were easy to slot in.

And by lunchtime, the finished product looked like this.


Raking the soil level, and topped with 50mm of mulch making it look almost professional! I also managed a bit of stonework around both sides to blend it in with the landscape.


I now need to find a way of getting the wheelbarrow up the steps or find an alternative route.


Friday, November 4, 2011

Memory Tree


Keira love's this blue/turquoise colour in her room - it's Dulux's Waikiki.  Recently I saw this tree painted on a wall in an IKEA magazine and immediately wanted to try it in her room.

IKEA FAMILY LIVE Summer 2011

I drew the outline of the tree with a piece of chalk and when I was happy with the shape I painted it in using the white paint that we used on the doors and trim.  I tried not to stress too much and be relaxed when I was drawing it on, but I still had to get up and down the ladder and stand back to look at it a few times!


We've just put up the few frames we had already in her room and over time can add to it.  I think it would look good with some keepsakes too, like her first ballet slippers, etc.  I love these stick on hanging strips from 3M.  They're great for these small, lightweight frames and seem to stay on the gyprock walls.  (They don't stay so well on our rendered walls . .)


We gave that armchair to Keira on her birthday this year and I made the cushions to go with it (and the wall). The patchwork one is made using some of the fabrics from the quilt I'm making for her and also includes an old dress that she had when she was little.


I'm including photos of the back because it's the first time that I've covered buttons with fabric and they worked really well.  I always thought they'd be fiddly but they were super quick and are very effective I think. 


I also gave piping a go on this one.  I have done that before and while I can't say I love the process, again I think it's worth it for the finish it gives.

Overall, I'm very happy with the way the wall looks and Keira really likes it too - which of course is the main thing! I think it's a nice thing to look at when she wakes up in the morning and it's also a good way to show new friends some of her memories.


Wednesday, November 2, 2011

On the Doorstep

Just outside our kitchen is a small herb garden.  It is so handy for quick pickings when your cooking.  The bigger vegetables all get planted in the much larger garden down near the poly tunnel and chickens.  But this garden, close to the house is perfect for the things we use the most.


At the moment, it's planted with lots of parsley, rocket, chives and lettuce.  The first lot of basil has also just gone in.  (I'm keeping a pot of this on the windowsill in the kitchen too, because the temperature can still drop quite low at the moment.)

We started off with just herbs in here, way back in 2008 when Keith first built the garden. But we have since moved the thyme, oregano, sage and rosemary out onto the sloping bank next door to this area.  

First plants to go in - October 2008

I really like the look of these plants, particularly thyme and sage, used as regular plantings and not confined to the productive part of the garden.

Oregano
Lots of Thyme (and Sage in flower at back)

Lots of herbs are flowering at the moment and it's interesting that they are mostly purple. I think they all look great together.


Related Posts Plugin for WordPress, Blogger...